• Photo cameras
  • Lenses
  • Tripod
  • Video Cameras
  • Bags
  • Studio
  • Image editing
  • Binoculars
  • Accessories
  • Promotions
  • Canon
  • Sony
  • Nikon
  • Panasonic
  • Fujifilm
  • Sigma
  • DJI
  • Tamron
  • OM SYSTEM
  • Epson
  • All brands
  • Popular Sony Cameras
  • sony-a7v-1.jpg

    Sony A7 V

  • sony-a6700-body_1.jpg

    Sony A6700 body

  • 12311310_1.jpg

    Sony Cybershot DSC-RX100 mark VII

  • Popular Sony Lenses
  • SONY-FE-24-70MM-F2.8-GM-II-1.jpg

    Sony FE 24-70mm F/2.8 GM II

  • SONY-FE-24-105MM-F4.0G-OSS-1.jpg

    Sony FE 24-105mm F4 G OSS E-Mount

  • SONY-FE-50MM-F1.8-1.jpg

    Sony 50mm F1.8 E-Mount Full Frame

  • Popular Nikon Cameras
  • Nikon-Z8_1.jpg

    Nikon Z8 body

  • nikon-z6-iii-1.jpg

    Nikon Z6 III

  • nikon-zf_1.jpg

    Nikon ZF

  • Popular Nikon Lenses
  • Nikon Z 24-70mm F28 S-line Nikkor 1.jpg

    Nikkor Z 24-70mm F2.8 S

  • Nikon-Z-70-200mm-F18-S-line-Nikkor-1.jpg

    Nikon Z 70-200mm F/2.8 S-line Nikkor

  • Nikon-Z-135mm-F1.8-1.jpg

    Nikon Z 135mm F/1.8 S-line Plena

  • Popular Panasonic Cameras
  • panasonic-g9ii-1.jpg

    Panasonic LUMIX DC-G9II

  • panasonic_lumix_S52X-1.jpg

    Panasonic Lumix DC-S5IIX Body

  • panasonic_lumix_s5_m2_body.jpg

    Panasonic Lumix DC-S5II body

  • Popular Panasonic Lenses
  • 12289260_1.jpg

    Panasonic 24-105mm F4.0 L-Mount

  • panasonic-lumixs-50mm-f18_1.jpg

    Panasonic Lumix S 50 mm F/1.8

  • 12217412_1.jpg

    Panasonic Lumix G Vario 100-300mm F4-5.6 II O.I.S.

  • Popular Fujifilm Cameras
  • fujifilm_x-t5_zwart-1.jpg

    Fujifilm X-T5 Body Black

  • Fujifilm-X-E5-zwart-1.jpg

    Fujifilm X-E5 black

  • fujifilm-x100vi-silver-1.jpg

    Fujifilm X100VI silver

  • Popular Fujifilm Lenses
  • Fujifilm_30700_foto1.jpg

    Fujifilm XF 70-300mm F/4.0-5.6 R LM OIS WR

  • 11024042_32426.jpg

    Fujinon XF 16-55mm f/2.8 R LM WR

  • Fujifilm_XF33mm_F14_RWR_foto1.jpg

    Fujifilm XF 33mm F/1.4 R WR

  • Popular Sigma wide angle lenses
  • sigma-24-70-f2.8-dgdnii-art-lens-1.jpg

    SIGMA 24-70mm F2.8 DG DN II Art Sony E-mount

  • Sigma-18-50-E_1.jpg

    Sigma 18-50mm F/2.8 DC DN Contemporary Sony E

  • Popular Sigma macro lenses
  • Sigma_105mm_F2.8_1_2.jpg

    Sigma 105mm F/2.8 DG DN Macro ART Sony FE

  • Popular Sigma telephoto lenses
  • 12201072_1.jpg

    Sigma 150-600mm F/5-6.3 DG OS HSM Contemporary Canon EF

  • Sigma_70_200_2.8_1.jpg

    Sigma 70-200mm F/2.8 DG DN OS Sports Sony FE-mount

  • Popular DJI Drones
  • DJI Mini 5 Pro Fly More Combo + Smart Controller & Cleaning Kit_1.webp

    DJI Mini 5 Pro Fly More Combo + Smart Controller & Cleaning Kit

  • 12508293_1.jpg

    DJI Air 3S Fly More Combo + RC 2 Remote Controller

  • Popular DJI action cameras
  • dji-osmo-action-6-adventure-combo-1.webp

    DJI Osmo Action 6 - Adventure Combo

  • osmo pocket4-in the box 2.jpg

    DJI Osmo Pocket 4 Creator Combo

  • Popular DJI Stabilisers
  • dji-rs-5-combo_12.jpg

    DJI RS 5 Combo

  • DJI-RS-4-Mini-1.jpg

    DJI RS 4 Mini Combo

  • Popular Tamron wide angle lenses
  • 12308793_1.jpg

    Tamron 17-28mm F/2.8 Di III RXD Sony FE

  • Tamron-28-75mm-F2.8-Di-III-VXD-G2_2.jpg

    Tamron 28-75mm F/2.8 Di III VXD G2 Sony FE

  • Popular Tamron macro lenses
  • Tamron-20mm-F28-Di-III-OSD.jpg

    Tamron 20mm F/2.8 Di III OSD Sony FE

  • Popular Tamron telephoto lenses
  • Tamron 28-200mm F2.8-5.6 Di III RXD_1.jpg

    Tamron 28-200mm F/2.8-5.6 Di III RXD Sony FE

  • 12425774-1.jpg

    Tamron 50-400mm F/4.5-6.3 Di III VC VXD Sony FE

  • Popular Olympus Cameras
  • 12481096_1.jpg

    OM SYSTEM OM-1 mark II body

  • OMSystem_Tough_TG7_rood_foto1.jpg

    OM SYSTEM Tough TG-7 - Red

  • Olympus-E-M10-IV-zilver_1.jpg

    Olympus OM-D E-M10 Mark IV Silver

  • Popular Olympus Lenses
  • om-system-mzuiko-12-40mm_1.jpg

    OM SYSTEM MFT 12-40 mm F/2.8 PRO II

  • 11011001_24500.jpg

    Olympus M.Zuiko Digital ED 60mm F2.8 Macro Black

  • Olympus_MFT_14-150mm_f40-56II_zwartED_M.JPG

    Olympus M.Zuiko Digital 14-150mm F4.0-5.6 II Black

  • Popular Epson printers
  • Epson-EcoTank-ET-8550_1.jpg

    Epson EcoTank ET-8550 All-in-one A3+ Photo Printer

  • 12364673_1.jpg

    Epson EcoTank ET-8500 All-in-one Photo Printer

  • 12333395.jpg

    Epson SureColor SC-P700 A3+ Photo Printer

  • Popular Epson scanners
  • 12171706_1.jpg

    Epson Perfection V600 Photo

  • 12203118.jpg

    Epson Perfection V850 Pro

  • 12447712_1.jpg

    Epson Perfection V39II Scanner

  • Nature photography
  • City photography
  • Model photography
  • Action photography
  • Reportage photography
  • Studio photography
  • Videography
  • Techniques

Silhouette photography

We all know a silhouette, the familiar black shadow that is created when you have too much backlight. Sometimes you deliberately want these, but most of the time this shadow arises by accident. Especially when shooting in automatic mode. In this article, we will tell you all about taking a silhouette photo, and we will give you a few tips, so you can take the most beautiful photos.

What is a silhouette photo

A silhouette photo actually speaks for itself, but we'll still explain it a bit. A silhouette is a black shadow created when you are having too much backlighting. The silhouette is one black or grey area where only the outline of the object can be clearly seen. The lack of detail adds much more tension in a photo. But how do you take a silhouette photo?

silhouetfotografie.png

How to take a silhouette photo

We can't give you written-out settings on paper when you get started taking silhouette photos, but we can point out what you can look out for to create a good silhouette. Focusing is not very complicated in this type of photo, as you focus on your main subject. But what is more challenging here is focusing on the transition from the main subject to the background. We'll give you a few tips to help you optimize your silhouette. By using a short shutter speed and small aperture, you easily underexpose your photo, giving your silhouette less detail, and when you take a low ISO, you create less detail in the black areas. This stands out quite a bit in the black areas.

Silhouetting is super complicated for our cameras to do well. The automatic mode will have a much slower shutter speed to highlight the underexposed parts. Another thing that can happen, your camera may pop out the internal flash to self-expose the subject. So then it's time to switch to shooting in manual mode. Then you can have a lot of influence on the silhouettes you capture.

Silhouettes in the studio

Of course, there are many ways to take silhouette photos; outdoors, in buildings or in the studio. But how do you do it in the studio where there is no room for daylight? If you create enough backlight it is quite possible to create a silhouette. Most of the light source should come from the back of your object. Place one light behind your subject, turn of your flash, and you can take a silhouette photo indoors!

Tips for taking a silhouette photo

To get started, we've compiled some tips for you. After reading, it's time to start practising and doing it. After all, you only learn photography when you start doing it.

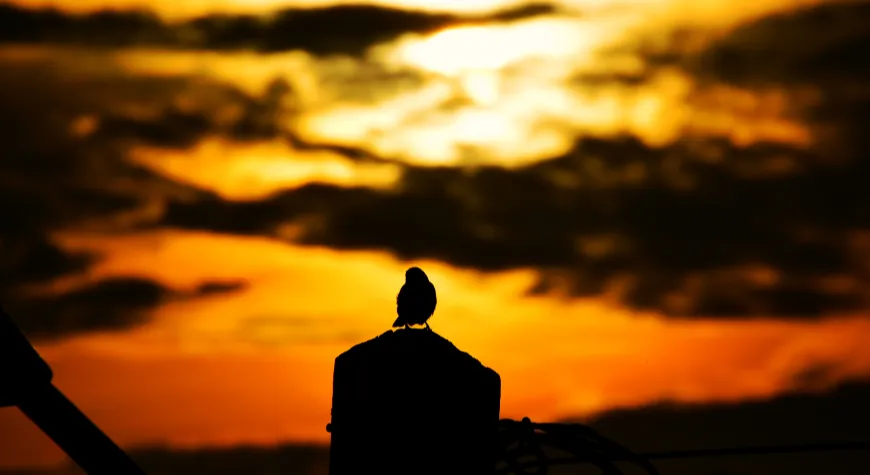
Background lighter than your subject

The most important thing when creating a silhouette is the contrast ratio between the background and the subject you want to capture. In fact, the background must be much lighter to create a silhouette. The easiest thing to do is to start taking pictures against the (sun) light, with the sky being part of the background. The background does not always have to be the sky, but also try a large lamp, screens or just windows.

silhouet_fotografie.png

Creating clear forms

A silhouette loses a lot of detail when it is well done. However, to keep the subject of your photo clear to viewers, it is important to keep certain things in mind. Make sure the silhouette has a clear shape and the subject can be recognized. For example, make sure the silhouette is clearly separated from the background and does not merge with other dark parts of the photo.

Squeeze your eyes together and see it in front of you

Not sure if you found the perfect situation for a photo? Then, squeeze your eyes together for a moment to get an even better sense of whether the situation is really appropriate. This is because a camera is limited in dynamic range, meaning that a camera is less able to capture both very light and very dark in a single image. When we can still "just" see the subject with our eyes, a camera cannot capture it as a silhouette.

Time to take silhouette photos

Photography can't be done without the right light, but what is the ideal time for taking silhouette photos? Dawn or dusk is often the most appropriate. That's because the sun is low in the sky, so the sky is not too far above the ground in bright colour. In addition, the sun's rays have a horizontal direction, this makes it easy for one part of the subject to fall into a shadow. Most of the silhouette photos are taken at sunrise or sunset.

But even just after sunset, you can still shoot good silhouette pictures. In fact, the hour after is also called the blue hour. That's because the sky is not black right away, but the subject is quickly darkened in the twilight. So ideal for silhouettes!

tijdstip_silhouette_foto.jpg

Post-editing for more contrast

Is it still too light for a good silhouette? Don't be put off then, because after shooting you can enhance the silhouette by using Photoshop or Lightroom. In these programs, you can increase the contrast in the photo and/or make the darker tones even darker.

Influencing the white balance

In addition to contrast and making your photo even darker, you can also play with the white balance. This will give your photo special colours and creative effects. The photos often consist of a limited number of colours: the subject is black/dark grey and the background (if it is a sky) has a limited number of colours.

When you affect the white balance, you can make colours warmer or cooler, it depends on what you want and what the photo needs. Changing the white balance can be done while shooting or in post-editing (only if you shoot in RAW).

Silhouette as a frame

Want to realize even more creativity in your photos? Instead of making a silhouette of the subject, make a silhouette of your subject's surroundings. Thus, you create a frame to focus attention on the subject that's actually exposed.

silhouet_kader.jpg

Exit automatic mode

Silhouetting is super complicated for our camera’s to do well. The automatic mode actually gets a much slower shutter speed to still highlight the underexposed parts. What is also possible is that your camera turns off the internal flash to expose the subject itself. Then it's time to switch to shooting in manual mode. Then from now on you can have a lot of influence on the silhouettes you capture.

Enough information and tips gathered, let's head outdoors! If you want to learn even more about how to take different photos or just edit your photos, take a look at our photography tips!