Tips from pet photographer Andreas Romijn
Andreas Romijn's captivating dog portraits are well-known. Curious as to how he manages to take his amazing photos? Take a look at his 7 unique tips below:
Andreas Romijn's captivating dog portraits are well-known. Curious as to how he manages to take his amazing photos? Take a look at his 7 unique tips below:

To attain "captivating" portraits, I work with lenses with a focal point between 85 and 105 mm. It is great to see how incredibly sharp the photos become with these. The choice of lens is down to personal preference, of course; you have to see what works for you. But this is certainly my preference. Photograph dogs at eye level. This gets them fully in frame and encapsulates their expression. The result is more realistic at eye level. And the animals' experience is more pleasant and on an equal footing.
Make sure that what you’re wearing can get mucky and be prepared to move about a bit. You shouldn't take animal photos from a height, standing still. This won't give you the natural vibe you're after.

Ask your client for a good quality photo of the dog beforehand. This will help you select the right background colour to complement the animal. With this dog, a Thai Ridgeback called 'Winner', I opted for a hand-painted grey background. The subtle details and highlights in the background lift the subject beautifully from the backdrop. The image is enhanced further by the coordinating tones of the background and subject.
This photo was taken using one flash, a so-called 'Deep Umbrella' (Profoto white L) with a diffuser. It's possible therefore to single out the subject and background with one flash in such a way that a balance arises between a photo's light and dark elements.

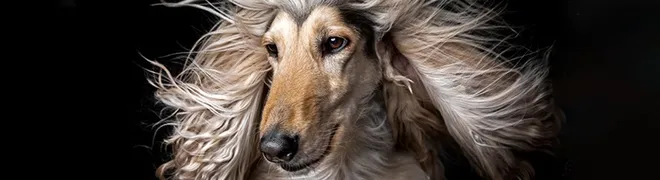
I gain a great deal of inspiration from model and beauty photography. Taking a portrait of a person or dog in itself isn't all that hard. But how do you generate dynamics in a photo? That is a little trickier. You want to take a captivating, original shot.
My tip is to use wind with long-haired dogs. But check with the owner first that their dog can handle it! Use a hairdryer (cold air) or a reflector to displace the air.

There are many breeds of dog, all distinctive in appearance and with unique features. The skill lies in highlighting these features, make sure you ask the client what it is they want to see back in the photos.
I photograph dogs with a longer snout from the side. A Weimaraner's very distinctive features are its long snout and ears. In this photo, I've 'pushed' the dog into a corner and cropped it. This gives increased scope in the direction of view on the left-hand side.

I started with the 'Dog & Model' concept two years ago. Was it unique at the time? Certainly not; nothing is unique in photography! I did put my own twist on it though. At the time, I also worked with a team that helped me put together a mood board. I wanted to create a romantic, elegant and vintage look and feel.
The quest for an elegant looking dog didn't take long, with a Saluki being the preferred choice (wind dog). The possibilities are endless. Think about a style and concept.
Contrasts are fun to do, for example, a fierce-looking dog with a good-looking model. Two years on, the 'Dog & Model' concept has evolved, and I run 'Mixing Styles' workshops with my colleagues. This workshop dovetails the styles and knowledge of two photographers. More info can be found about this on my social media profiles (Facebook and Instagram).

Photographing black/dark-coloured dogs can be tricky because the light is "absorbed" as it were, meaning the details are lost. When I photograph dark-coloured dogs, I use light shapers that are silver on the inside. Silver gives a contrasting image and brings the highlights in the dog's coat out more. To lift a black dog from the background I used strip lights. Apply subtly. Use grids to main control of the light.
I often use a reflector with a grid in it. These can be bought in a range of sizes and degrees. Apply the grid's diffusion to the size of the dog. I use strip lights pretty much all the time, as well as a background light. This creates a lot of depth in a photo.

For a photographer to switch from dogs to humans isn't necessarily the most obvious genre of choice. Nonetheless, I set out to learn a new skill, to step out of my comfort zone. The latter is very insightful, you know. By doing something new, new ideas come to you. That in turn stimulates creativity. If you're thinking of making that switch from photographing dogs to humans, I've got a few tricks up my sleeve for you.
Join forces with, or hire, a model, make-up artist or wardrobe stylist. Leaving you to focus on the photography. If you want to start with 'owner & dog' shoots, hire a make-up artist. Look at whether the clothing palette matches the dog's coat.

In 2010, Andreas bought a camera to take shots of Onyx, his new dog at the time. Concepts such as shutter speed, aperture and ISO value were alien to him, so he did everything on the automatic setting! Countless snaps were taken of Onyx: by a tree, in the water, and so on.
After a few years, Andreas bought a set of flashes and a roll of background paper and got to work with them. In 2015, he started with studio photography, taking photographs of families, weddings, products, and of course, dogs! After much practice over the course of a year in his home studio, it was time for the next step – choosing a specialisation.
In 2016, as a co-tenant, Andreas started at the HIA 3D studio in Hendrik-Ido-Ambacht. He ran workshops, both at home and abroad. The last three years have seen many developments, on the photographic and business sides. By working hard, collaborating, being daring and critically assessing the market, Andreas was able to set up a successful photography company. Andreas enjoys working with other photographers, such as Sonja de Vlaming.
It's clear to see that Andreas enjoys using Profoto gear. He recently became a Profoto ambassador. People get the opportunity to become acquainted with a few popularly-used light shapers at his studio workshops. Would you like to gain some experience using studio gear? You can now do so on paid for studio days. The dates of these will soon be posted on Andreas' Facebook and Instagram profiles.
Andreas uses gear across the price spectrum. He uses and combines different brands, but his favourites are Profoto and Elinchrom. For example, a good combination is the Profoto D2 flitskop with the Rotalux Deep Octa 100cm. This is a great working combo, but you do require the Elinchrom Rotalux Speedring MK2.
For the dog and model portraits, he uses the Profoto Softlight Reflector Silver with or without diffuser. The how and why can be read in this article. In addition, the so-called 'Deep Umbrellas', strip lights, and reflectors with grids are frequently used in his studio work!
Andreas uses a Sony camera, as he was after a lighter, newer camera. Choice of gear is always personal, yet the quality of the images speak for themselves. Mirrorless is the way forward; he currently works with a Sony A7R Mark III camera and the Zeiss Batis 85mm F/1.8.
Subscribe to our newsletter