Nachtfotografie

Night photography: beginner guide and tips!

All these tips will prepare you to make the most amazing photos!

Taking a picture in the dark of the night, takes more than making one during the day. A great night photo requires the right preparation, timing, and settings. This article explains it all.

Tips | The Blue Hour | Settings | Inspiration | Safety

Night photography tips

We'll start with a few simple tips, to get you on your way.

statief

1. Use a tripod

Due to the low light conditions, you're (almost always) going to be working with slow shutter speeds, so you won't be able to manually control the camera. To avoid motion blur, place the camera on a sturdy tripod.

stabilisatie

2. Turn off image stabilisation

In this instance, the tripod acts as the stabiliser. If your camera or lens then tries to stabilise as well that may in fact result in lack of focus. So, it is best to turn it off during shooting in the night.

focus

3. Focus carefully

Focusing in the dark is easier said than done. The autofocus can run into problems in low light. Use the Live View to focus carefully, or do it manually. You can change to manual focus with a small button on the lens of your camera.

afstandsbediening

4. Use a remote

To avoid motion blur, use a remote. . When pressing the shutter button, the camera may accidentally move. You can avoid this by operating it remotely. Don't have a remote? If not, you can also use a timer so you don’t move the camera.

histogram

5. Check your histogram

The histogram instantly lets you know if your photo is under or overexposed. If the graph veers more to the left, there is a lot of darkness in your photo, and vice versa. Use this as a tool. In the end, the choice is yours though.

voorbereiding

6. Prepare well

Good preparation is half the battle won. Deciding in advance where you're going and what gear you'll need will stand you in good stead. Make sure you check the weather forecast before you head off too. That way you'll know if there will be clear skies.

blauwe uurtje

Bonus tip: The Blue Hour

The Blue Hour (sometimes called the Golden Hour) is the ideal time for stunning night photography. It's the period of time just before sunrise and just after sunset. Unfortunately, despite the name, you don't get a full hour to capture your beautiful shots. The time slot often amounts to between ten and twenty minutes. The soft light and colours in the sky create a perfect balance between the sky and your subject, such as a city. There are useful apps to download for your Smartphone that tell you when to head out, for example: Golden Hour One and Magic Hour.

Settings

Now that you know a little about what to expect, and the best time to head out the door, the next key point is choosing the right camera settings. Primarily, you need to keep an eye on the exposure triangle, but your white balance is very important too. The right camera settings can make or break your night photography results.

Low ISO

The ISO value determines the brightness with which your photo is taken. You may be tempted to set it to high because it is dark outside. But if you're using a tripod there's no need to worry about slow shutter speeds, so you can use a slow shutter speed to bring light in the photo. Set the ISO as low as possible to avoid unnecessary noise. Star photography is an exception to the rule, but more on that later.

Small aperture

To start with, you determine the aperture as you would at any other time. If you want minimal depth of field, choose a large aperture. However, most night photography is done with a wide-angle lens, so depth of field doesn't come into it as much. A smaller aperture of between f/11 and f/16 is advisable. Many lenses also yield sharper results in that aperture range. Also, due to the small aperture, (small) light sources, such as lampposts, turn into stars in the photo. This results in a stunning effect.

Slow shutter speed

To complete the exposure triangle, we mustn't forget the shutter speed. It's been discussed many times, and it's probably old hat for you: use a tripod and step up the shutter speed! This is not an issue at all, certainly with static subjects. If you are dealing with moving subjects, such as cars or trees blowing in the wind, you will need to keep a close eye on whether your shutter speed is too slow.

nachtfotografie stad

Manual white balance

A very important element of night photography is the white balance, or colour temperature of your photo. Natural and artificial light have different colour temperatures. If you let your camera figure it out on its own it will probably get confused by the presence of both the natural evening light, the lamp posts, and other artificial light sources in the city. This can, for instance, cause your photo to turn out yellower than intended. So be sure to set your white balance manually. Or better yet: shoot in RAW, which lets you effortlessly correct the white balance during post-processing.

Inspiration

Perhaps you already have a clear idea of what you want to photograph at night. If not, we've put together a few inspirational topics for you.

sterrenhemel

Starry Sky

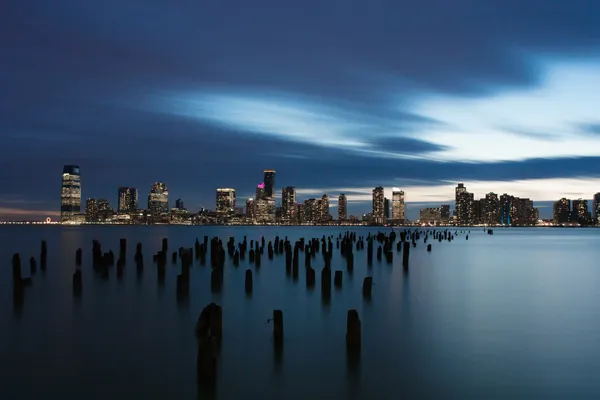
Remember lying on the beach in the height of summer, under that enchanting starry sky? An astronomical work of art, and a wonderful subject to capture. To capture this, pick a cloud-free night, preferably in the countryside. Choose the countryside because light pollution in cities renders the stars less visible.

Star photography requires slightly different settings than normal. In fact, to capture as much light as possible from the stars, you need to increase the aperture and step up the ISO value. For example, ISO 1600 or 3200, depending on how much noise your camera produces at these settings.

Golden 400 rule

As the earth continuously rotates, the stars in your picture will change position. To this end, the Golden 400 rule was devised. This helps you determine the maximum shutter speed at which your stars remain dots and do not become light trails. The rule is: 400 / (focal length (mm) × crop factor = maximum shutter speed in seconds..

Calculation example: You're shooting with a Canon EOS 90D (crop factor: 1.6) and an 18-55mm lens at 18mm.

400 / 18 x 1,6 = 13,9 seconds

That means, in theory, you can maintain a shutter speed of about 13 to 14 seconds to avoid light streaks. But this will be a matter of trial and error. You may find that sometimes light trails are just what you need. So, have fun!


Urban photography

You don't always have to head out into the countryside. There is also plenty to photograph in the city. Take, for instance, the beautiful buildings or amazing city life. Similarly, there is plenty to capture on a city trip abroad.

Remember when we talked about the blue hour? When you're out and about in the city, this is important to remember. The way natural and artificial light blends together in the photograph works wonders. Also, don't forget the tip about the effect of a relatively small aperture on light sources, such as lamp posts. This turns them into little stars; adding to your photo instead of detracting from it.

Also, look out for water in the city, such as a river or a lake. The combination of a slow shutter speed, and continually moving water, makes for exceptionally "soft" water in your photo. The results are stunning. If you like, you could use this to depict a reflection.

stadsfotografie in de nacht

lichtstrepen

Light stripes

It was touched upon briefly in star photography, but of course there is much more to be done with (moving) light. Shoot amazing photos by standing at a busy traffic junction in a city, or along a highway. This is because the lights of the cars move through your image, displayed as streaks of light on your photo. The slower the shutter speed, the more light streaks you'll get from cars. Too much light isn't always what you want either. This is why it's important to check out the traffic situation beforehand, and to adjust your shutter speed accordingly.

Keep a close eye on your belongings

Don't lose sight of your valuable equipment. Thieves grasp their opportunities in the evening hours, and can take off with your belongings in the blink of an eye. Always keep your backpack on your back. Don't put it on the ground unattended, while you're busy setting up your tripod and looking through your camera's viewfinder. That way you can be sure that no one will sneak off with it.


Read more

wintersport

WHAT IS THE BOKEH EFFECT?

What is bokeh and how do you create it? Read all tips here.

> Read article

lightpainting fotografie

WHAT IS LIGHTPAINTING?

By painting or writing with light, you create dreamy images.

> Read article